Creating and editing features in linked layers must be carried out as a multi-user editing session. A multi-user editing session will automatically be started if the map is activated via a details record that previously had no associated spatial feature. Otherwise, the user can choose to start a multi-user editing session (see below), providing the map has been activated from a details form since loading the GIS. If a layer has been configured as read only then the Multi-User Editor is not available.
A multi-user editing session always has an active ID - this is the ID of the database record from which the map was activated. Any new objects created within the session will automatically be given the active ID, and will also be given any other transferred attributes. Existing features that are modified will retain their original ID and transferred attributes, irrespective of the active ID. The active ID will only change once the map is activated from a different details form.
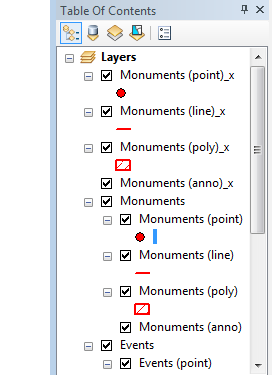
When an editing session is active, the temporary editing layer is visible as the uppermost layer in the table of contents. This editing layer has the same name as the active layer with '_x' added to the end, with the same settings as the source layer for symbology/labelling etc.
To create a new feature for a database record with no associated spatial feature:
- When the map is activated from the database record, a dialogue box will inform the user that there are no linked GIS features with this ID. If the user chooses to create a feature, a multi-user edit session will automatically be started for the map layer with which the database record is linked, which the user will be prompted to accept. This layer then becomes the active layer, and the ID of the database record becomes the active ID.
- The temporary editing layer will appear in the table of contents (see above). On the Editor toolbar, set the task to ‘Create New Feature’
- If the active layer is a family layer, the user will also need to set the target on the Editor toolbar to the required Feature Class layer.
- Use the standard ArcMap editing tools on the Editor toolbar to digitise one or more new features. Different tools will be enabled or disabled depending on the geometry type of the target layer.
- Whilst the user is still in the editing session, the newly digitised features will appear with the editing layer style settings.
- At the end of the editing session, choose ‘Stop Editing’ from the Editor pull-down menu on the Editor toolbar. Once the edits have been saved, the newly-created features will automatically be given the active ID, i.e. the ID (and any transferred attributes) of the database record from which the map was activated.
To edit existing features, or to create new features for database records which already have associated spatial features:
- When the map is activated from the database record, the layer with which the database record is linked becomes the active layer, the associated spatial feature(s) is automatically selected, and the ID of the database record becomes the active ID.
- Start a multi-user editing session by clicking on the Editor pull-down menu on the Editor toolbar and selecting the ‘Start multi-user editing’ option or by selecting Start Multi-user editing from the XGArcApps menu ().
- The temporary editing layer will appear in the table of contents, and any selected features will be placed on the editing layer. It is possible to edit any of the spatial features in the active layer, providing that they are selected before the multi-user editing session is initiated. To change which features are being edited, choose ‘Stop Editing’ from the Editor pull-down menu on the Editor toolbar, select a different feature(s) and start a new multi-user edit session.
- Use the standard ArcMap editing tools on the Editor toolbar to digitise one or more new features, or to edit existing features.
- At the end of the editing session, choose ‘Stop Editing’ from the Editor pull-down menu on the Editor toolbar.
- Any existing features that are modified will retain their original ID. However, any new features created will always be allocated the active ID, i.e. the ID (and any other transferred attributes) of the database record from which the map was activated.
Editing Annotation Layers
- Make sure the ArcMap Draw toolbar is visible.
- Start a multi-user editing session.
- Go to the Drawing menu on the Draw toolbar and set the Active Annotation Target - it will only be possible to set this to the annotation layer from the active layer family.
- Use the standard ArcMap Draw tools to make the appropriate edits to the annotation layer.
- At the end of the editing session, choose ‘Stop Editing’ from the Editor pull-down menu on the Editor toolbar.
Ending an Edit Session
- Stopping the edit session will save the new or modified features in the target layer, and they will be displayed with the style settings of the target layer. On ending the edit session, the database geometry information will be automatically updated for any newly-created or modified features. See the ‘Update Database’ button for more information on updating the database geometry.
Saving edits can be slow if a large number of features are edited in a single edit session, particularly if the features are linked to multiple database records. It is advisable to keep edits to as few features as possible in a single edit session.