What is a Map Template?
On a day-to-day basis users wish to print a wide range of maps for showing the location of particular sites, the extents of particular features (e.g. Nature Reserves, proposed by-passes, vegetation type coverage) and for illustrating proposals in reports. Most of these maps are similar in that they may require titles, a legend, map scale, logos, copyright notices etc. A map template provides a pre-prepared design layout, which can include some or all of these components.
How can the Map Templates module help?
The map templates module can simplify the task of creating a map print-out by producing a standard layout at a user-defined scale, which saves time and reduces the chance of errors or omissions.
Creating a map layout from scratch every time a print is required can be time consuming and confusing, leading to mistakes or poorly presented maps at non-standard scales. Using the templates module, a variety of standard and specialist map layouts can be created for different purposes, paper orientations and sizes. Users can select their required map layout from an unlimited list of user configurable layouts, and then be automatically prompted for variable text such as titles and notes. This ensures that presentable standardised maps can be created at the desired scale and with a minimum number of mouse clicks. All maps produced using the templates module will have a standardised and professional ‘look and feel’.
Using Map Templates
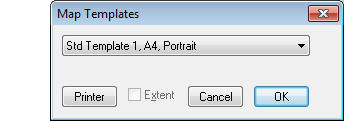
Create a map from a template by pressing the  button. A dialog box will open asking you to select from the pull-down list of available templates (below). Templates are set up by your System Administrator. Additional templates can be created as required.

| Button |
Function |
| Printer |
This opens the standard Printer Setup dialogue to change the printer or printer settings. Note that the printer settings must be set to match page size and orientation of the template chosen. |
| Cancel |
Cancels the dialogue. |
| OK |
Having selected the template and checked the printer setup, press ‘OK’ to proceed. You will be asked to complete details about the map (below). The final map layout will have the same centre as the MapLink Map Window, but not necessarily the same extents. |

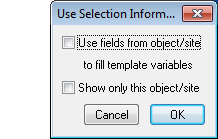
The first option is only displayed if a single map object is selected. If the template has been configured to use an expression for a variable value then the data for this value will be automatically supplied for that variable.
The second option allows non-selected objects on the map layer containing the selection to be omitted from the printed map. E.g. you may only want to display a single planning application and not other applications on neighbouring or the same site. Note that the same effect can be achieved by clicking the ‘Show Only’ button in the map window before going to the template.

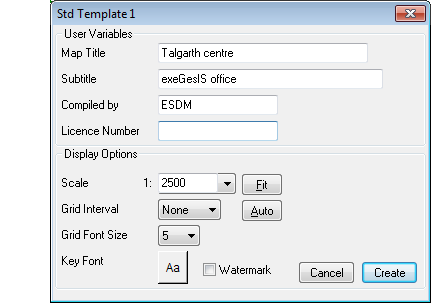
The particular captions and number of fields shown is dependent on the template set-up, as customised by your system administrator. Default values may already be entered in some of the fields, but these can be edited, and you should complete any white boxes by typing the relevant information into the fields or choosing from the pull-down lists.
Titles and scales will be saved for multiple maps created during one MapLink session, but will return to default values in subsequent sessions.
| Field/Button |
Description/Function |
| Scale 1: |
This defaults to the value specified in the template configuration. However, any value can be entered by choosing from the pull down list or typing directly into the field. The scale of the output map will be adjusted accordingly. The Fit button calculates the largest scale at which the contents of the Map Window can be displayed in the chosen template. This calculated value should be adjusted to a sensible value, e.g. 2343.42 to 2500. It is advisable to use ‘standard’ scales if at all possible, e.g. 1:500, 1:1000, 1:1250, 1:2500, 1:5000, etc. |
| Grid Interval |
Create a labelled grid on the final layout. Choose the grid interval from the pull-down list, or select None if no grid is required. The Auto button selects the most suitable grid interval for the scale selected. |
| Key Font |
Change the font for the map key, using the standard MapInfo Text Style dialogue box. Otherwise the default text style set for the template will be used. When a key is included in a template, the extents of the box can be changed if required by double clicking in the box and reshaping in the layout window. Or, it can be changed in the actual key window. |
| Watermark |
Select whether or not to apply a watermark to the printed map. The watermark is configured in the file xg_Watermark.TAB in the XGApps directory. If a watermark is required, this should be created by the system administrator. See Confiuring the Watermark. |
| Cancel |
Cancels the current operation and returns to the previous dialogue. |
| Create |
This generates the map layout at the user-defined scale and centred on the same view as the MapLink Map Window (below). |

At this point you may wish to edit your map further. Select the appropriate drawing or text tool to add text and graphical objects to the map preview. Note that any annotations or features added here will not be saved in either the MapLink workspace or the template definition, and will be displayed on the current map only.
| Button |
Function |
Select
 |
Select objects in the map template. |
Zoom In
 |
Zoom in to an area of the template. Select the tool and click on the map to double the scale or click and drag to zoom into a specific area. |
Zoom Out
 |
Select the tool and click on the map to halve the scale or click and drag for a dynamic zoom out. |
Pan
 |
Move the map relative to the map window. |
Print
 |
Send the completed map to the Printer. Opens the standard Windows Print dialog. |
Page Setup
 |
Set the paper, orientation and margins |
Text
 |
Place text onto the map preview. This may be a particular comment or observation relevant to the map printout. |
Point
 |
Add point symbols to the map preview. |
Polyline
 |
Draw linear features on the map preview. |
Polygon
 |
Draw closed boundaries on the map preview. |
Close
 |
Use this to close MapLink and return to the host database. |
On the left of the template window is a further set of tools which allow you to modify the map within the template.
Template tools
| Button |
Function |
Zoom In
 |
Increase the map scale. The scale is doubled each time you click on the map. |
Zoom Out
 |
Decrease the map scale. The scale is halved each time you click on the map. |
ReCentre
 |
Select this tool to re-centre the map. Click the button and then click on the map point you wish to centre on. |
Reposition
 |
Use this tool to set a new coordinate as the map centre and a new map scale. |
Add North sign
 |
Add a north sign to the map. Click on the button and then click on the template to position the north sign. You can modify the size and the symbol by using the main Select Object button and then double clicking on the symbol. |
Save as Layout
 |
Saves the current layout to a .lay file. Layout files can be used with the optional add-on exeGesIS Templates module. |
Return to Map
 |
Closes the print template and returns to the map. |
To change the style for text, points, lines or polygon objects, or the north sign draw the object as usual and double-click on it to access the standard MapInfo 'Set Symbol Style' functionality.